How to protect against future plate cracks during construction...
... Older instruments often develope carcks in the top plate (belly), which then require complicated repair. I believe most of these cracks can be avioded if the excess moisture is removed from the plates before gluing together in new construction, and each time the instrument is opened up and before regluing back together again.
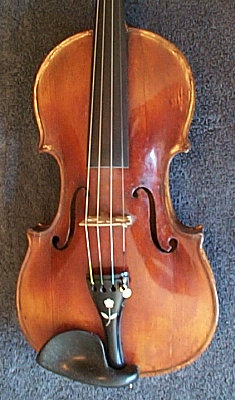
...This is the top plate of a 1709 German made, Klotz violin, showing typical spruce wood cracks.
...This kind of injury can happen suddenly when the humidity drops very low. The moisture stored in the wood (especially the top plate which is made of spruce wood) is given up to the very dry atmosphere which causes the wood to shrink across the grain, putting the top plate under a great tension load. Because of the design of the violin, the sound box is very rigid and does not want to let the wood shrink from side to side. The wood is weak in that direction and can relieve the stress by cracking apart, unless the glue joint fails and releases the strain!
...This is a very good reason to keep the humidity level around 50% at all times for the completed instrument. The better violin cases have a relative humidity gage built in. It it gets too low, moisture is introduced into the air in the case to maintain the desired level.
...Now what if when we built our violin, or before we glue it back together, we remove the excess water by exposing the wood parts to a very dry atmosphere just before regluing. When the wood absorbs its normal level of moisture, the wood grains will swell tightly together; and should it be exposed to very dry conditions in the future, the wood would only return to the condition it was in when it was glued up and there would be no tension stress.
... When the wood grains swell together, it puts the wood under a compressive load. Wood is very strong in compression and it tends to hold the grain together, which is what we want.
...Another interesting fact is that wood under compressive loads transmits sound better, which should help our instrument to its job.
...In old England, violin makers would fashion the plates during the winter and then join the parts together into finished instruments in the Summer months during dry weather. {A sustained period of 30-35% relative humidity.}
...We can simulate those conditions now by using a commercial grade of Desiccant as follows; (which is what I do on all my violins and whenever I must take an instrument apart):

...The basic tool is industrial grade desiccant that can heated to drive out the moisture and re-used many times. I got mine mail order. I got enough to fill this steel muffin tin about 1/3 full. I bolted on carriage head (rounded top) bolts to an even height. I then rubber coated the tops to minimize heat transfer that might hurt delicate varnish.
... The desicant tray is put into an ordinary home oven and heated to 350 degrees F. for 1/2 hour. The heat drives off the absorbed water from the desiccant material. Open the door several times during this heating process to allow moisture to escape from the oven, to help the drying process.
...I have measured the weight before and after drying and this much desiccant can absorb about 10 grams of water! Notice that when dried out, it turns a deep blue color, but when laden with moisture it was a deep brown color.
...Remove it from the oven and let it air cool for about 10 minutes so the metal parts are not so hot. (We are going to put this into a plastic bag after all.) Since it begins to absorb moisture right a way, we want to get it into the drying bag with the opened instrument as soon as possible. I now have cut out plastic strips that seal the open area and add a wood cover to temporarily shield the dried desiccant while the temperature drops to safe levels.
... Have the violin pieces ready to go:
I make some spacers (with notches at top and bottom so that air can circulate to all the wood surfaces) which allow air to freely circulate to the unsealed inner surfaces of the wood. It is these surfaces that receive and give off the moisture, as the outer surfaces are sealed with varnish. {they are never coated inside because that hurts the tone of the instrument}.
...I also include an electronic realive humidity meter inside (the small white unit) so I can keep track of progress.
...This assembly is then put into a new black plastic garbage bad, the excess air is squeezed out and the top of the bag is twisted together tightly and sealed with the twisted wire.
...I then put this into another, and another bag, just to be sure, but one is enough if there are no tears or imperfections to the bag.
... I store the bag inside a warm room, or out in the sun shine during the day and then back into the house for overnight (up to 24 hours). I then remove the parts and recharge the desicant in the oven, and put back into the bag for at least another eight hours (another day would be even better).
...As soon as I remove the parts from the desiccant bag I put the parts to be re-glued into a per-heated warming box so they can be warmed to about 100 degrees F. As soon as the parts are uniformly warmed I glue, fixture, and then clamp in the previously described fixture (for complete instruments).
...If you have had the desiccant bag in the sun, you can skip the warming box and immediately glue together, confident that you have provided the best insurance against future cracks and sudden weather (very low humidity) changes.
Modified 7/2017
Page AA_32