Copyright (c) 2020 by David Langsather, all rights reserved...
Revised 1/2021
AA-26/35
Bass bar adjustment (shaping, adjusting for acoustics)...
...An important part of any violin family stringed instrument is the bass bar.
...It is so named because it is attached just under the 'bass' (lowest toned string) side of the bridge, that is, the left side bridge foot.
...It gives added support to the top plate (belly) on that side and helps to distribute the sound vibrations down the plate in both directions.
...One of the important items in making an instrument that will have an excellent tone, response, and power is this bass bar.
...It is made of spruce wood; and is quarter sawn when looked at from the end; that is the annual growth rings appear to go up and down, toward and away from the plate wood. Try to select a wood on the Wood Tone scale (probably 198, 213, or 242 HZ. still not definitely determined), and wood having a Rub Tone of # 22 {the ideal}.
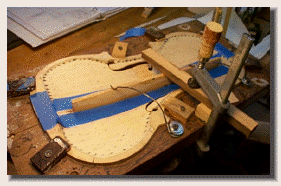
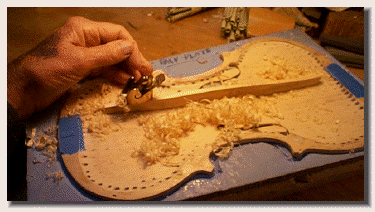
...Typically this bar is carved from a blank which is cut to the desired width before-hand. Usually this width is uniform through out its length; 5mm (0.197") wide, or 5 1/2mm wide . The bottom side (toward the top plate) is carefully shaped to exactly follow the plate's inside contour (which is finally shaped before the bass bar is fitted and glued on. When perfectly fitted, the bar is glued into place with violin making glue, usually perpendicular to the predominant contact surface (as the curvature changes throughout the length of the bass bar). Pre-glue the glue surfaces with weak glue and let dry to prevent warping on the final joint.
... I prefer to pre-heat the bass bar and top plate to about 100 degrees F. before gluing; this ensures the glue will stay liquid and give the closest bond possible. This gluing operation should take no longer than 30 seconds to complete if all is pre-fit and in readiness. Brush hot water along the edge of the glue joint to reset the glue inside. Dry with a cloth or paper towel.
...Once the glue dries (overnight) then the top surface can be carved to its final and permant shape.
... The remainder of this section is about doing this final shaping or making adjusting changes to affect certain tone relationships to the top plate:
..The bass bar length is 10 1/2" length for a 14" top plate.
..Bridge center line is marked 7 5/8" down from front edge of top plate.
..Normally the bass bar is positioned so that its center passes under the left foot of the bridge and the upper end is shifted .050" toward the center line and the lower end (toward end pin) is shifted 0.050" toward the side. This is to help prevent cracks on the top plate over time...
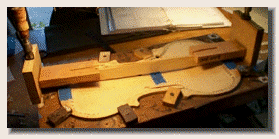
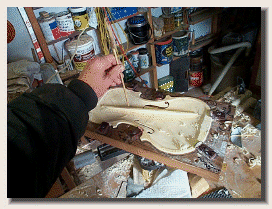
.. Here is a fixture holding the trail bass bar vertically to help me fit the bottom perfectly to the shape of the graduated top plate.
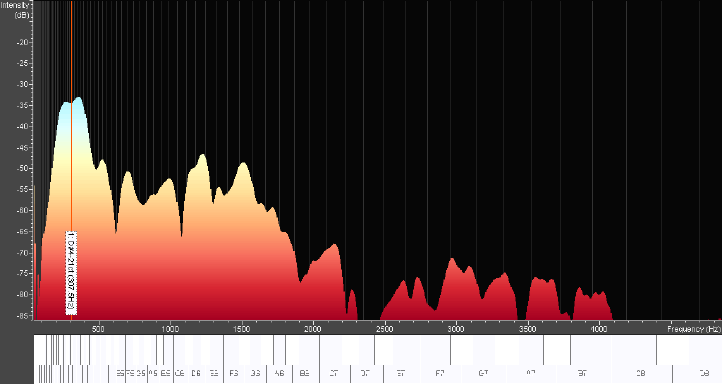
...On the left axis, is sound level in Db; on the bottom you see the frequencies generated by a tap in the center of the top plate of my Opus #22 violin. The first prominent sound peak is the 'fundamental tap tone' that we are to listening for. However, our wonderfully designed ears (brain, nerves, etc.) hear all these generated sound frequencies at once. The highest pitches (in this case 4,000 hertz, vibrations per second) is the easiest for your ears to hear, as our hearing is more sensitive to high frequency sound. However, the 'fundament' tap tone is the first major peak in the sound envelope; this is the tap tone frequency, that we want to hear and compare, and adjust.
...This is the sound specturm from a tap on one plate of a recent violin, and will serve as an example of what a tap tone is composed of and what we are to listen for: the lowest part of the tap tone...(shown here in red):
...Doing the final bass bar shaping with this method will result in a bass bar of the classical shape and you will have built your violin with a bass bar that matches the instrument acoustically, for better quality sound, adjusting for the sound characteristics of the particular pieces of wood that you are working with.
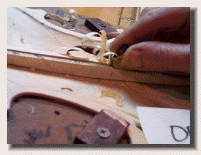
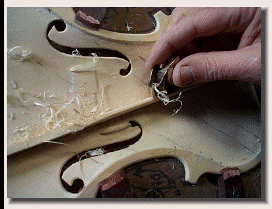
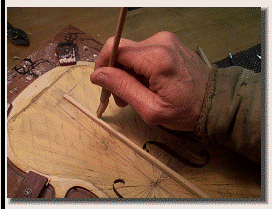
...If the bass bar is too low at any one point, the frequency there can be raised by slightly tapering the sides of the bass bar at that point(leave the bottom surface, which is glued to the top plate, its full width). This will increase the downward tap tone. If the tap tone is too high in a certain place, then scrape or sand a little material off the top surface at that point to lower the tone there.
... If, however, you are working with a mature instrument whose top plate is at a different frequency (and you do not want to change that tap tone frequency) ; then you might adjust the bass bar so that its tap tone is even over all its length and in acoustical harmony with the plate (which should also have an even tap tone all-over) .
..Lightly round over the top edges and make a 45 degree angle cut on the two ends of the bass bar with a sharp chisel (be sure to protect plate from damage); and make the final adjustment back to (191.3) HZ.
... Slowly work down the bass bar with violin plate making planes and scrapers, and finally sandpaper; all the while checking the tap tones and working more on the areas that are relatively too high first. Make the tap tone, over all the length, even ( the same pitch) and then slowly lower it until you reach your goal frequency {191.3 HZ}; then you are done.
... Really the first step in fitting, shaping, and then tuning (adjusting the tap tones) the bass bar is to make a hold down plate. The inside of the hold down plate is cut out to allow the arching to project downward and edges to lay flat. On mine, there are eight clamp blocks that screw down to hold the edge firmly flat.
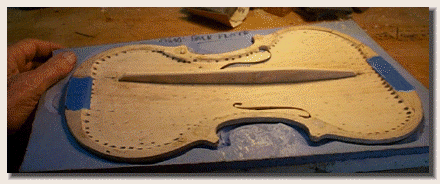
...Once the bass bar is glued into place, we can begin to shape the bar. It will be thickest in the center and taper toward each end.
...The completed bass bar will look something like this...and the tap tone down on the top surface of the bass bar will be (191.3) HZ all along its length (to be in acoustical harmony with the 213 HZ top plate).